How to Invite Team Members, Clients, and Guests in Atarim
Different invitation flows for different kinds of people — your team, your clients, and one-off reviewers.

Atarim draws a clear line between internal team members, clients, and one-off guests — each uses a different invitation flow because they end up with different accounts and different views of the platform.
Step-by-Step Guide
Inviting Internal Team Members
First, the important distinction so you pick the right path — in V5 there are three different “invite” surfaces, and they’re not interchangeable:
- Workspace team — Administrators and Team Members, invited from People. This is the main one, and each person uses a seat.
- Project sharing — inviting people to one specific project or website only. This is how you add Collaborators and guests.
- Add a Client (Beta) — creates a client with their own client workspace and a monthly credit budget, and invites them by email.
Two roles can be assigned when you invite from People: Administrator and Team Member.
Method 1 — Invite Team Members From the People Screen
Instructions:
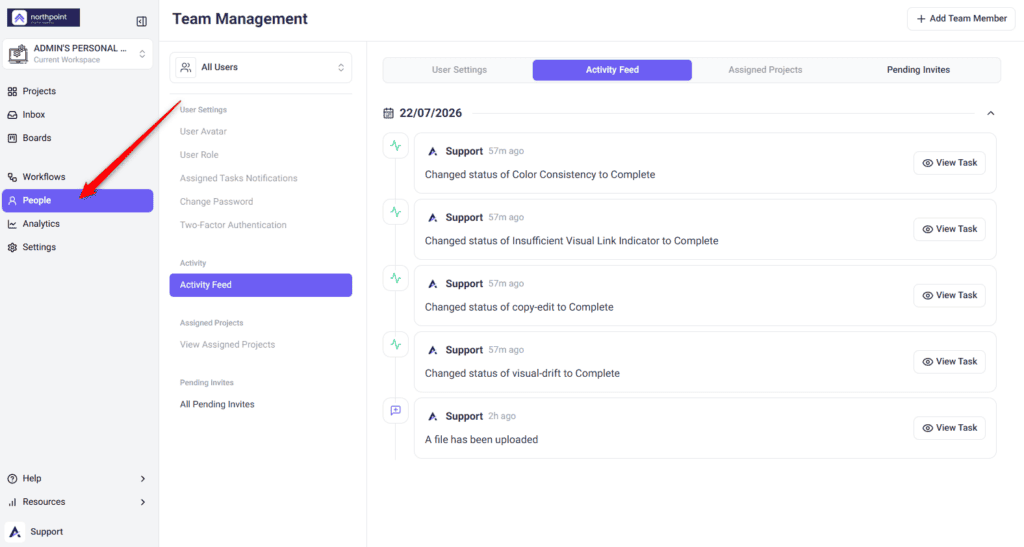
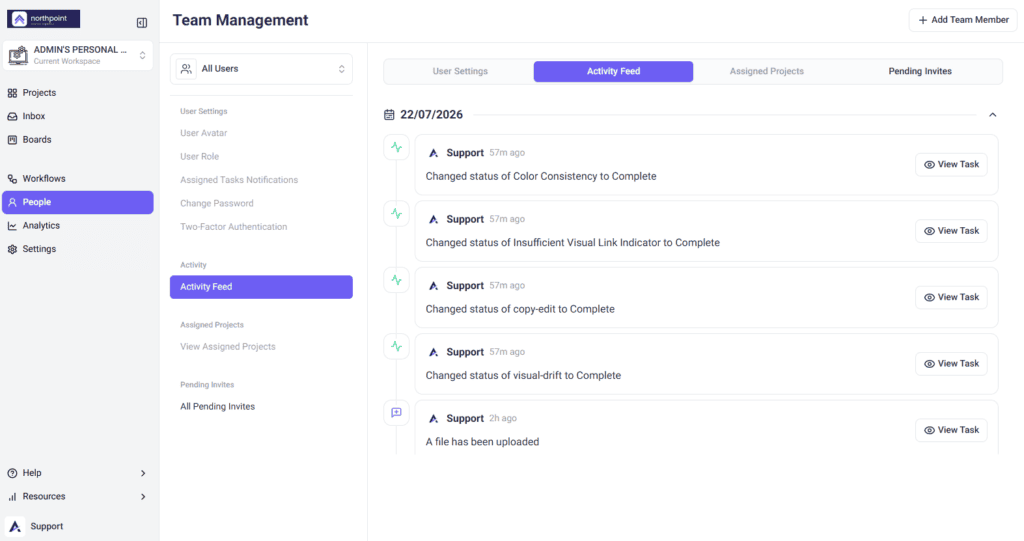
- From the main dashboard, open People in the left navigation. People is admin-only; if you do not see it, your role does not have People access.
- Review the current team list and any pending invites shown here.
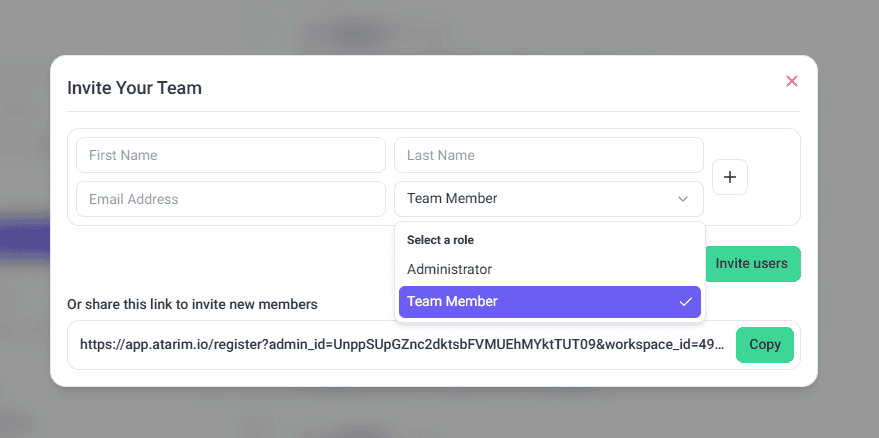
- Select Add Team Member. The Invite Your Team window opens.
- Enter their First Name, and their Last Name if you like.
- Enter their Email Address.
- Open the Role dropdown and choose either Administrator or Team Member.
- To invite several people at once, select + beside a row to add another, and repeat steps 4 to 6 for each.
- Select Invite users.
- Each person receives an email invitation and appears as pending in the People list until they accept.
Method 2 — Invite people to a specific project (Project sharing)
Instructions:
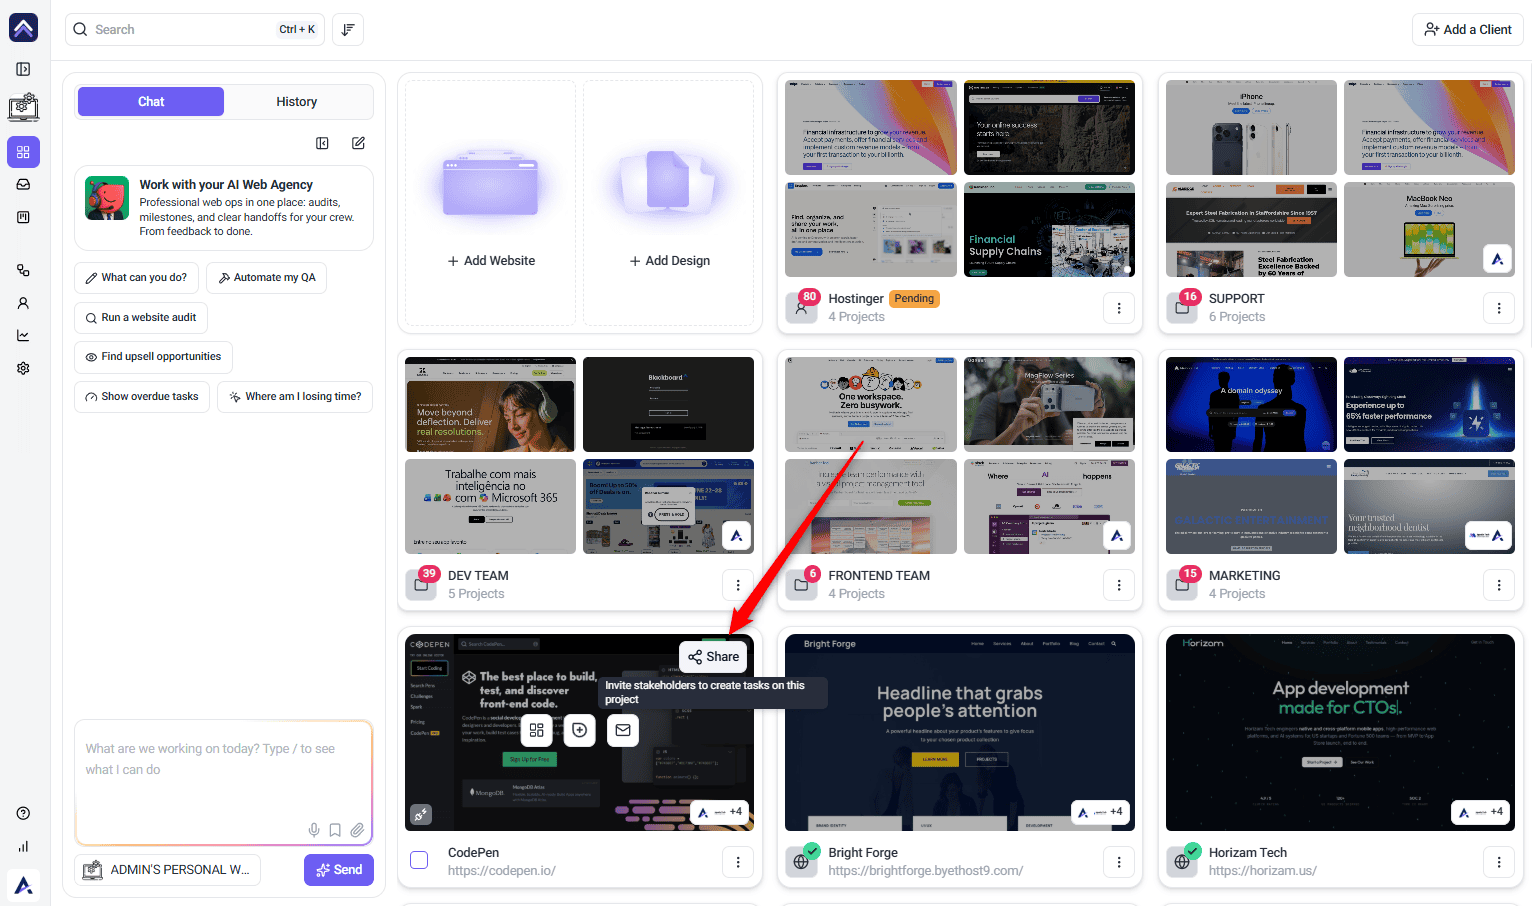
- From the main dashboard, go to Projects.
- On the project you want to share, select the Share action (the share icon; tooltip “Invite stakeholders to create tasks on this project”).
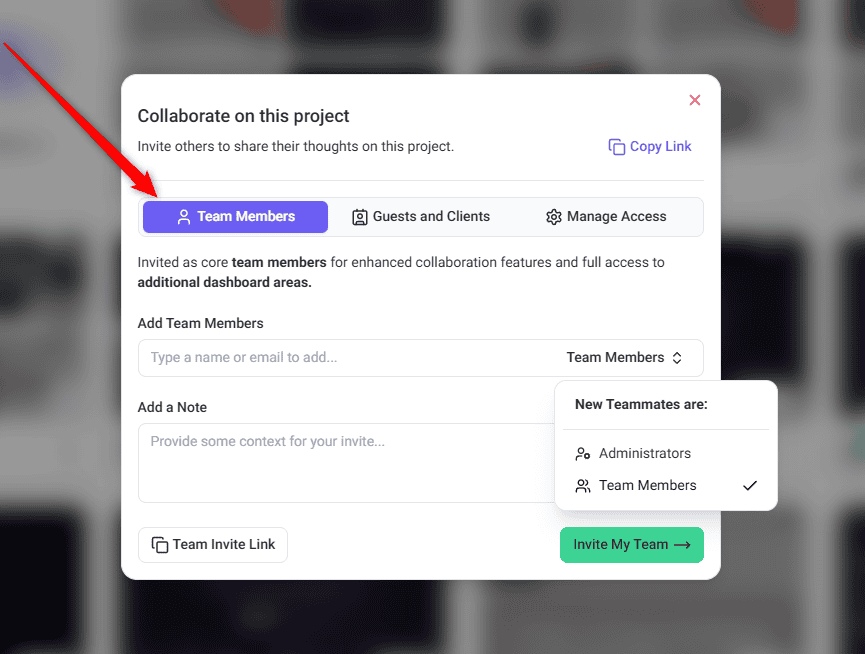
- The Collaborate on this project window opens on the Team Members tab.
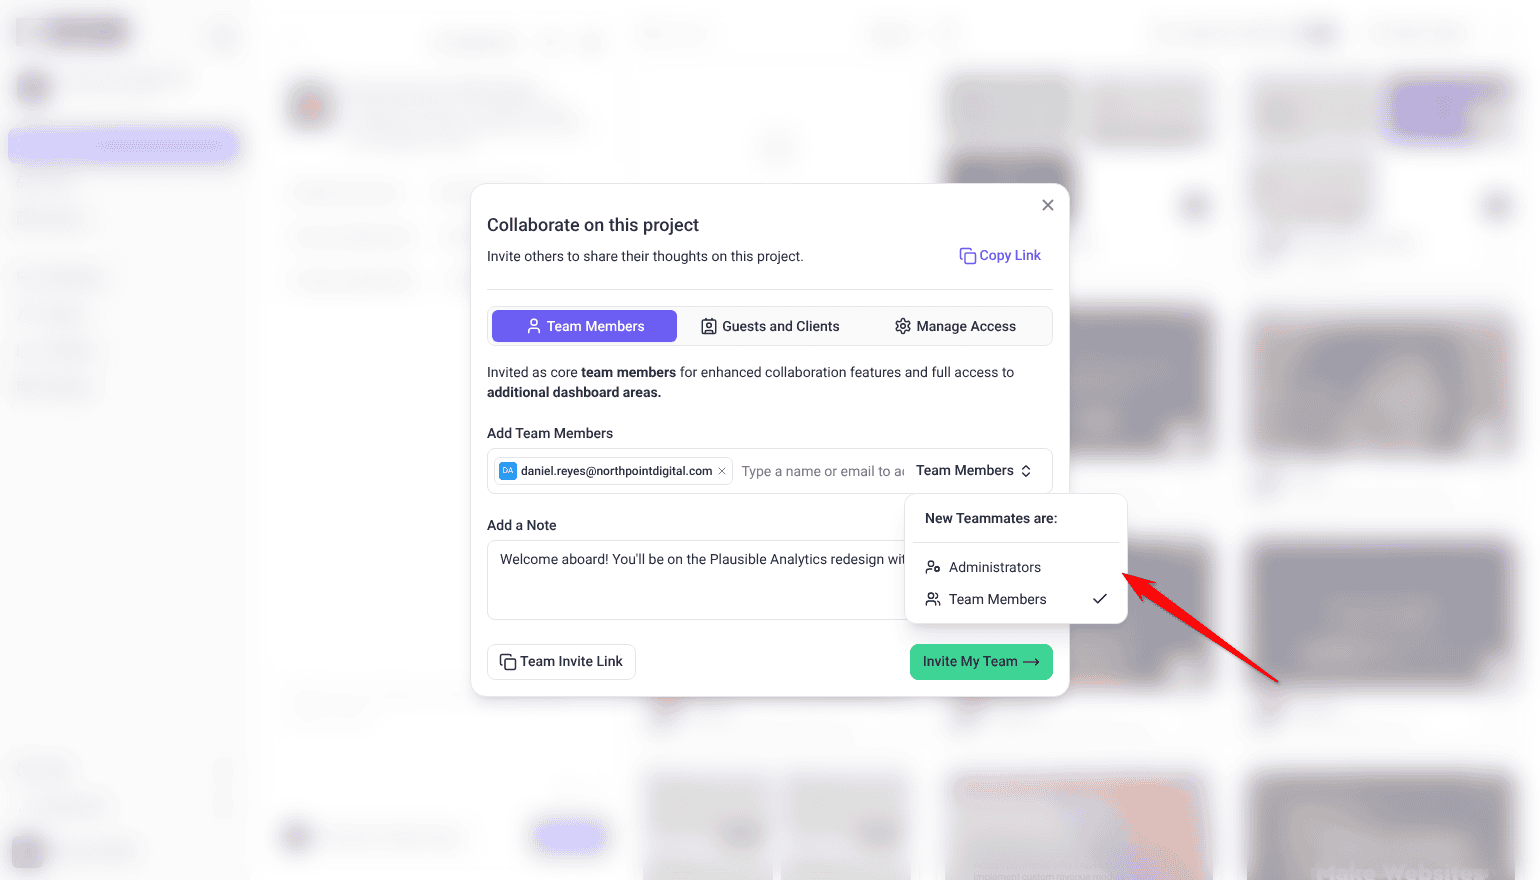
- Under Add Team Members, type a name or email address and select the person. Only project administrators can add a new email address here.
- Use the role menu beside the field (New Teammates are:) to choose Administrators or Team Members.
- (Optional) Write a message under Add a Note.
- Select Invite My Team. Invited people appear under People with Access on the Manage Access tab, where you can resend an invite or remove someone.
Method 3 — Invite Users From Collaborate View
While working directly on your project in the frontend (Collaborate view), you can invite collaborators without leaving the design interface.
Instructions:
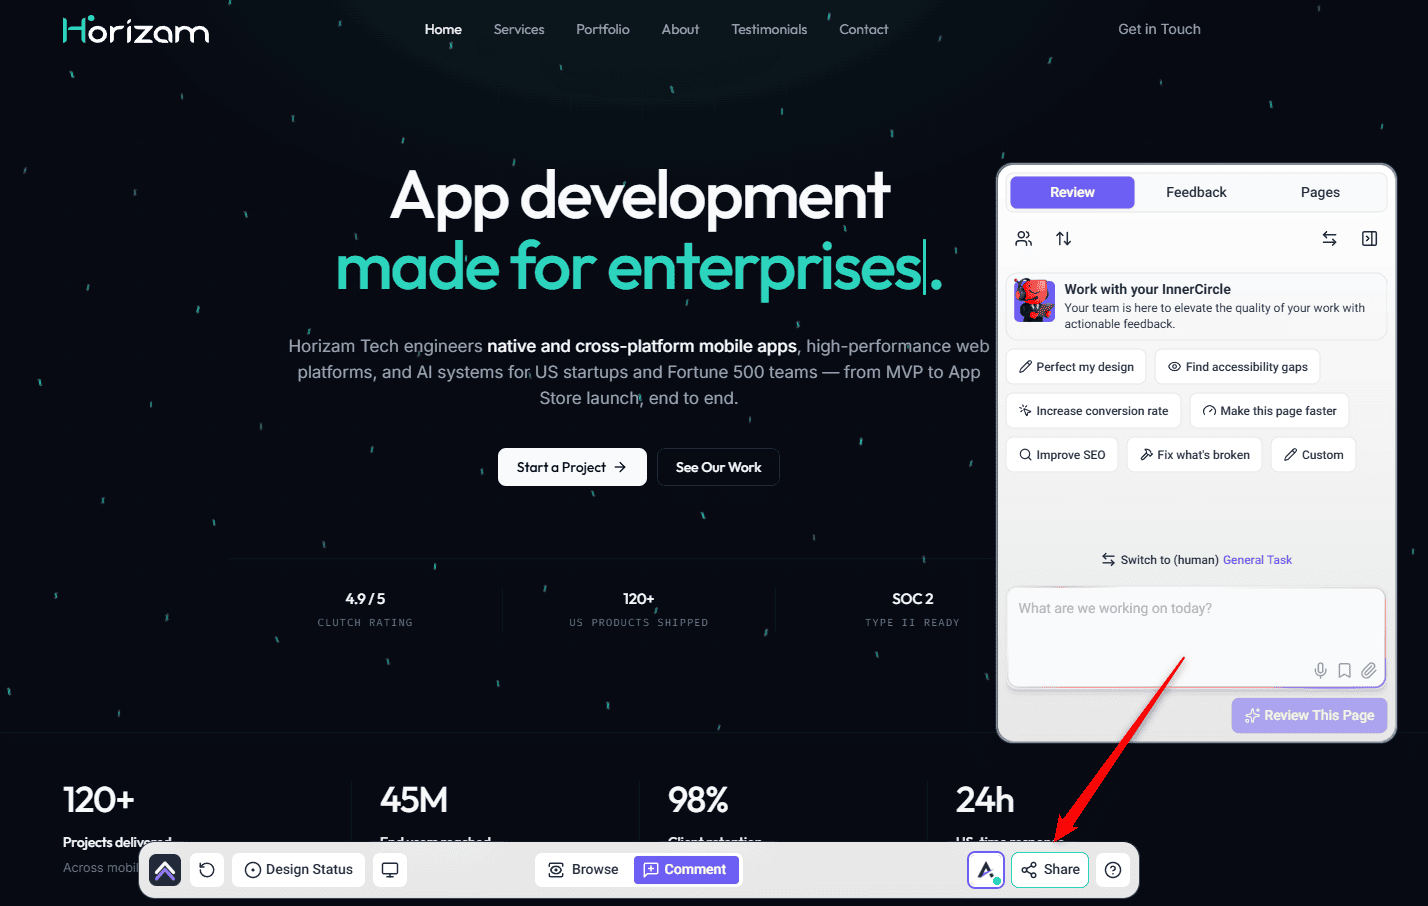
- In the Collaborate view of your project, look at the bottom bar.
- Select the Share button to open the same sharing modal that appears on the Projects screen.
- Choose the Team Members or Guests and Clients tab, then add people as in Method 2 or the guest steps below.
- Send the invitation.
Method 4 — Invite a Client (Agency, Credit-Based)
Instructions:
Add a Client (Beta)
A client added this way gets their own client workspace, shown as a folder on your Projects screen, and a monthly credit budget. That is what separates it from a guest invite.
Instructions:
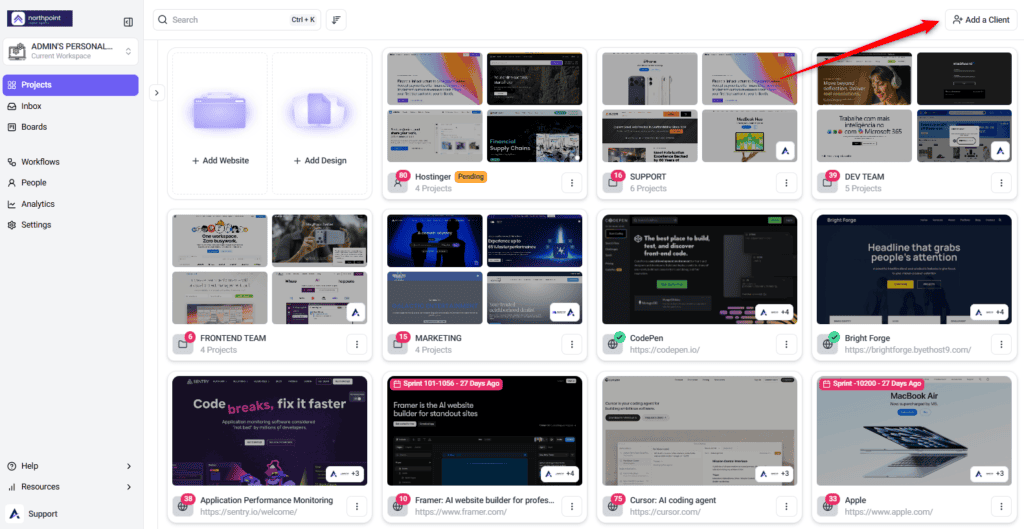
- On the Projects screen, select Add a Client (top right). Add new opens on the Add a client option.
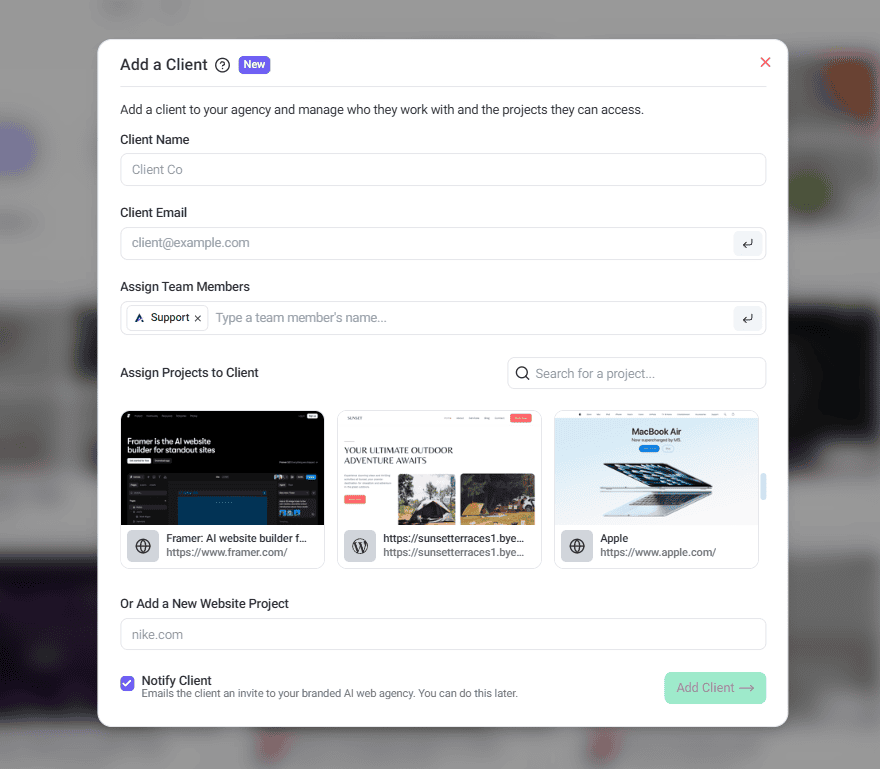
- Enter the Brand name and the Client email. The email is required.
- Leave Notify the client ticked to email them an invite under your brand, or clear it to invite them later.
- Set the Client budget: the monthly credits this client’s work can spend, from 1,000 to 10,000 a month.
- Under Assign projects to this client, select any existing projects.
- Select Add client. The client appears on Projects as a Pending folder until they accept.
Set the client’s budget
You set the first budget when you add the client. To change it later, use Set Budget. It appears in the folder menu once the client has accepted.
Instructions:
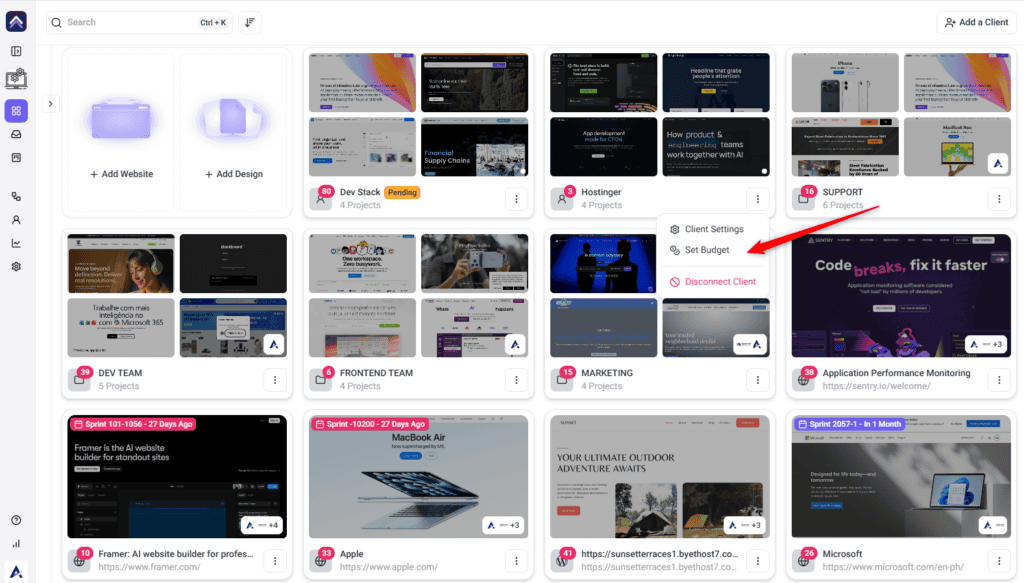
- On the Projects screen, open the client folder’s ⋮ menu.
- Select Set Budget. (Available once the client is connected — a pending client shows Client Settings / Copy Link / Revoke Client instead.)
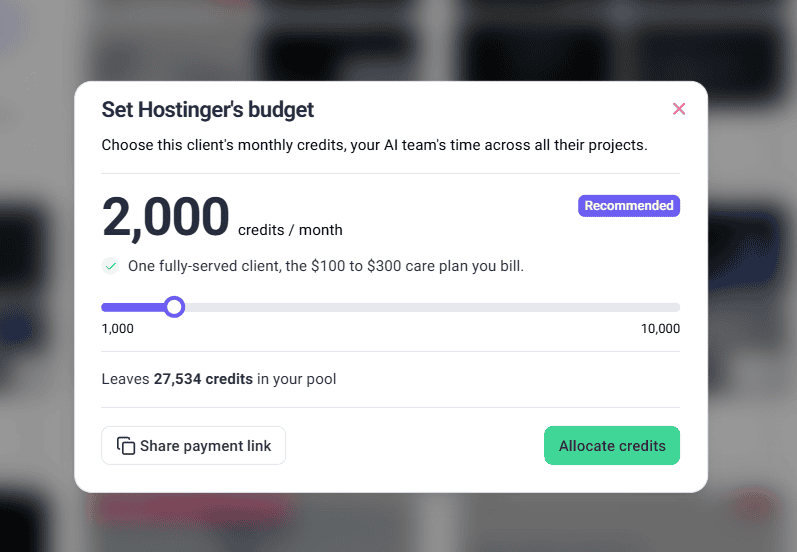
- Use the slider to set monthly credits (1,000–10,000; default 2,000). The modal shows what remains in your pool.
- Select Allocate credits (or Share payment link to have the client pay).
Move an existing project into a client’s folder
The steps above assign projects at the moment you create the client. To hand a project over afterwards, pick it in Client Settings or drag it onto the client’s folder.
Instructions:
- On the Projects screen, open the client folder’s ⋮ menu and select Client Settings.
- Under Assign Projects to Client, select the projects you want to hand over.
- Select Save Changes.
Alternatively, drag the project card and drop it onto the middle of the client’s folder card. Dropping to the left or right of another project reorders your projects instead of moving them.
Guests (No-Login Collaborators)
For one-off feedback from someone who doesn’t need a full account, use a link-based Guest invite scoped to a single project — no registration required on their end.
Instructions:
- Open the Share modal for the project — either from the Projects screen (the Share action on the project) or from the Share button in the Collaborate view. The Collaborate on this project window opens.
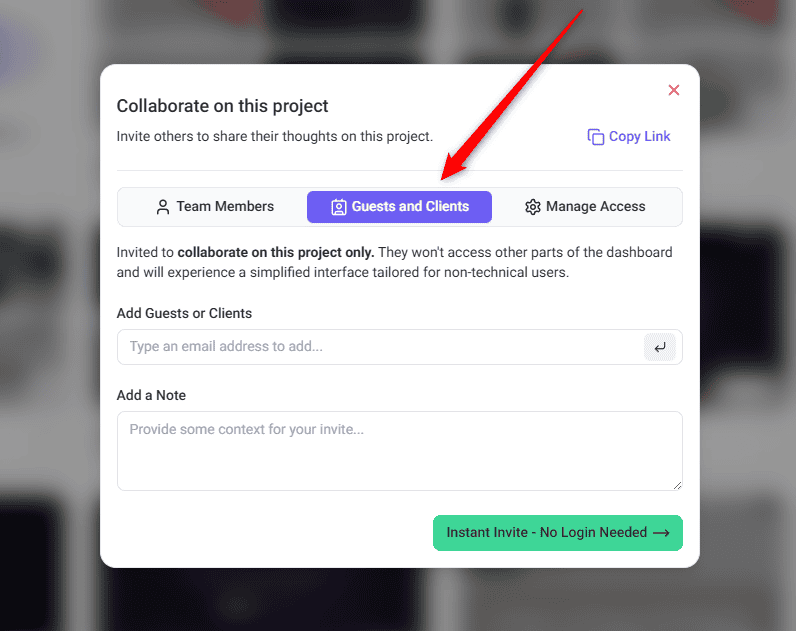
- Select the Guests and Clients tab. You’ll see the note that guests are “invited to collaborate on this project only” and get a simplified interface.
- In the Add Guests or Clients field, type the guest’s email address and press Enter to add it. Repeat to add more than one guest.
- (Optional) Under Add a Note, add context for the invitation (“Provide some context for your invite…”).
- Select Instant Invite – No Login Needed.
- The guest receives an email invite and can open the project and leave feedback without creating an account — scoped to this project only. They join the project as a Collaborator.
When to use a Guest instead of a Client
If you’re not sure the relationship will be ongoing, invite as a Guest first. When it becomes ongoing, set them up properly through Add a Client (Beta) — there isn’t a one-click convert from Guest to Client, so plan to do this manually.
Permission Levels Explained
- Administrator: Full access to everything in the Atarim dashboard, including project management, user invitations, and global settings.
- Team Member (internally “Contributor”): Access only to the projects they’re assigned to. They can view and work on tasks within those projects.
- Collaborator: An outside reviewer added to specific projects. They see only those projects and have limited task controls by default, and they don’t use a seat.
- Guest: Someone with no Atarim account who comments on a project through its link, giving a name and email address.
FAQs
Can I change a user’s role after they’ve been invited?
Yes. An administrator can change it from the People page: select the person and choose a new User Role.
Why can’t I see the People screen?
The People screen is admin-only. If you are a Team Member rather than an admin, it will not appear in your sidebar. Only admins can invite and manage team members from there.
Why is Collaborator not an option when I invite from People?
The People invite form only offers Administrator and Team Member. Collaborators (Guests) are external, so they are added through the Share modal on a project or in the Collaborate view, not from People.
What happens if I invite more people than I have seats for?
The invite window tells you how many extra seats you need and what they add to your monthly price. Selecting Invite users then takes you to checkout, and the invites go out once the seats are added. You can also share an invite link from the People screen instead of emailing each person individually.
What is the difference between a Guest and a Client?
A Guest is for one-off feedback on a single project: link-based, no account required, scoped to that project only. A Client is for an ongoing agency relationship, where you assign them projects and allocate a credit budget. There is no automatic conversion between the two, so if a Guest relationship becomes ongoing, set them up as a Client manually via Add a Client (Beta).
Can I invite people while working on a live page or design?
Yes. In the Collaborate view, the Share button opens the same sharing options as the Projects screen, so you can invite a teammate, guest or client in real time without leaving the canvas.
What is the difference between sharing a project and adding a client?
Project sharing grants access to one specific project and lets you set a role (Administrator or Team Member) and an access level (Anyone with the link, or Only people with access). Add a Client (Beta) is an agency-level flow that connects an external client, assigns them projects, and allocates a monthly credit budget from your pool. Team members are assigned separately, from a project’s menu.
Why do I not see “Set Budget” for a client I just added?
Set Budget (Beta) only appears once the client has accepted and is connected. A client who is still pending shows Client Settings, Copy Link and Revoke Client instead. You set the first budget when you add the client, so Set Budget is only needed to change it later.
Can Team Members see all projects?
No. Team Members only see the projects they have been assigned to. Administrators have full access across the workspace.
Conclusion
Picking the right invitation flow up front — team, client, or guest — keeps your People screen organized and gets each person into the account type that actually matches the relationship.
Tips & best practices
- Use Guest invites for anyone you're not sure will become an ongoing relationship.
- Give a client a realistic budget when you add them, so their workflows don't stall waiting on credits. You can change it later with Set Budget (Beta).
- Reset a project's Share modal back to “Only people with access” after a one-off open-link invite, so it doesn't stay open longer than intended